Spring 구조랑 흐름 파악을 하기 위해 간단한 프로젝트를 진행했다. (정말 작고... 소중해...)
- 개발 환경: IntelliJ IDEA
- 개발 언어: Java
- 데이터베이스: Oracle
- 빌드 도구: Gradle
- 개발 기간: 2022.06.10 ~ 2022.06.12
1) 사용할 투두 리스트 부트스트랩 찾기
프론트에 큰 시간을 두고 싶지 않아서 부트스트랩을 사용했다
사용한 투두 리스트 부트스트랩은 아래와 같다
https://codepen.io/jagathgj/pen/ZEGXqgd
Angularjs + bootstrap = todo
...
codepen.io
2) 프로젝트 생성하기
Spring Starter Project을 이용하여 프로젝트를 생성하였다

3) 데이터베이스 생성하기
진짜 간단한 CRUD를 구현할 거라 테이블 하나만 준비했다.

idx: 투두 리스트의 고유 번호
item: 투두 리스트의 아이템 (즉, 제목이자 내용)
status: 투두 리스트의 상태 (Y, N만 받을거라 1BYTE로 설정)
사용한 쿼리문은 아래와 같다
-- 데이터베이스 생성 --
create user todo identified by todo;
grant resource, connect to todo;
commit;

-- 테이블 생성 --
drop table todo;

CREATE TABLE todo(
 idx    number not null,
 item   varchar(100) NOT NULL,
 status varchar(1) default 'N'
);

-- 시퀀스 생성 --
DROP SEQUENCE seq_idx_no;

CREATE SEQUENCE seq_idx_no
INCREMENT BY 1
START WITH 1 ;- 투두 리스트를 입력하면 일단 할 일을 완료하지 않은 상태이기 때문에 default 값을 N으로 지정하였다.
- idx 값을 쉽게 계산하기 위해 시퀀스를 생성하였다.
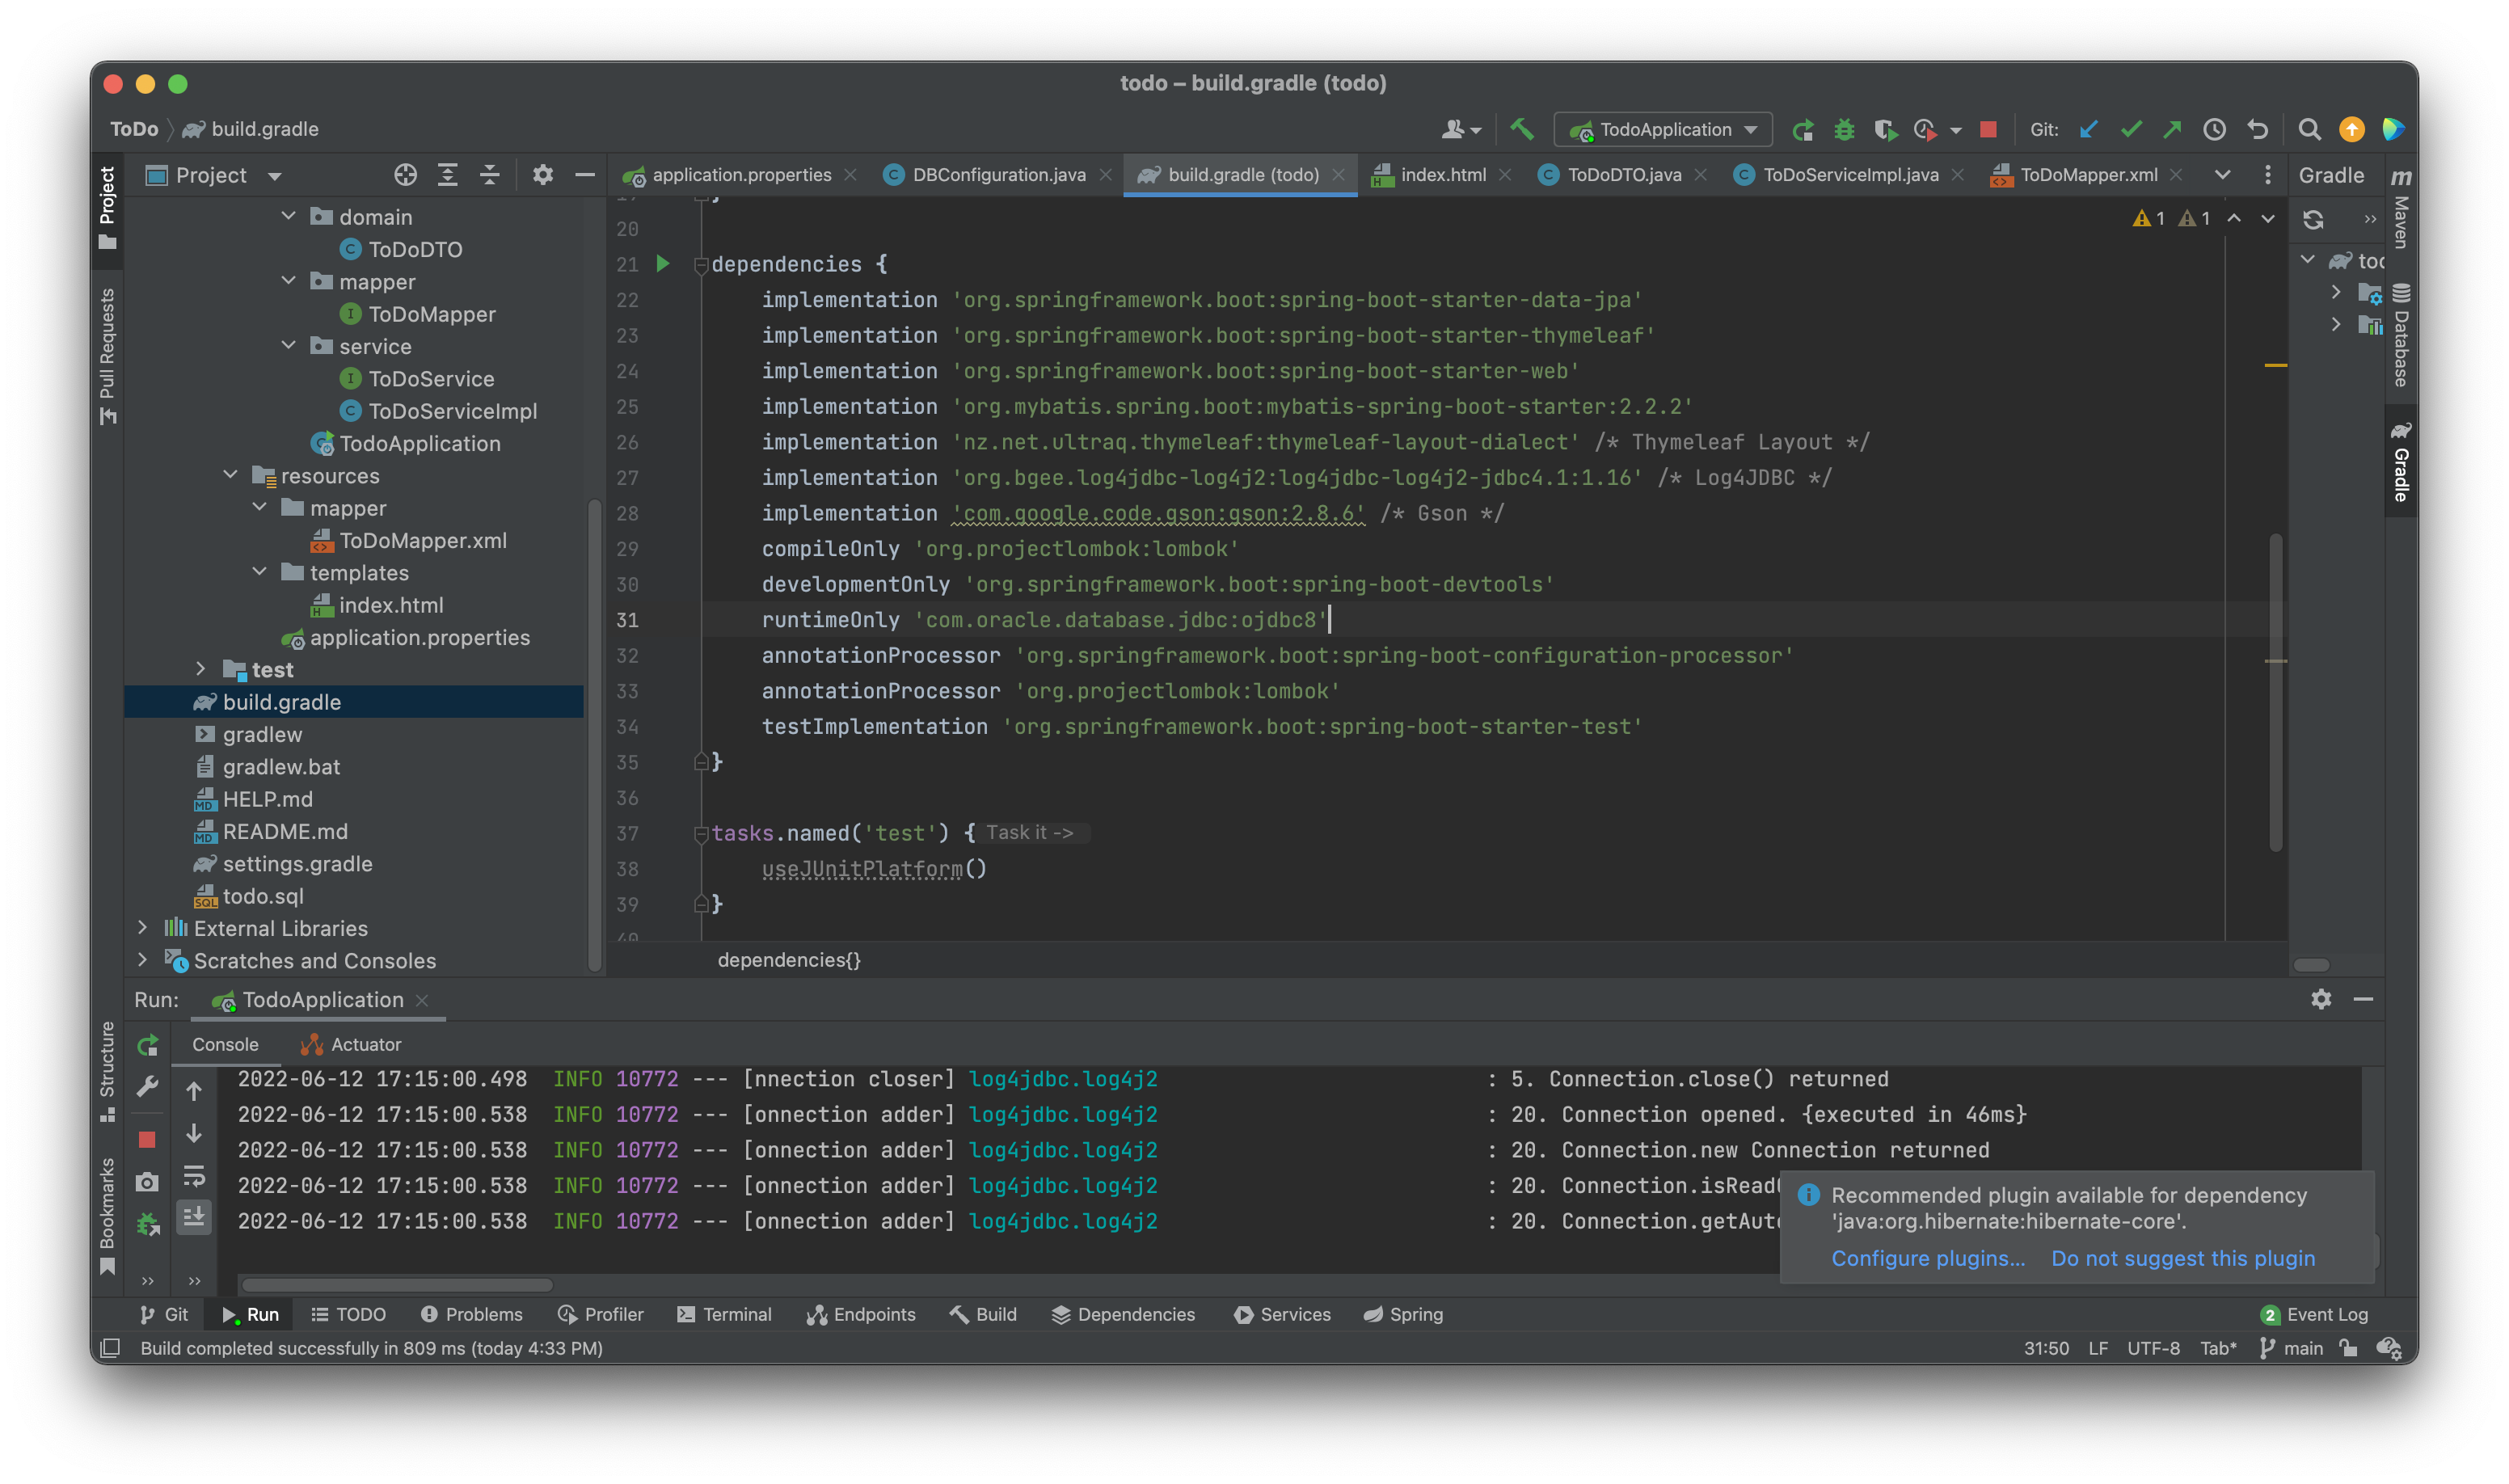
4) application.properties 작성하기
# HikariCP
spring.datasource.hikari.driver-class-name=net.sf.log4jdbc.sql.jdbcapi.DriverSpy
spring.datasource.hikari.jdbc-url=jdbc:log4jdbc:oracle:thin:@localhost:1521:xe
spring.datasource.hikari.username=todo
spring.datasource.hikari.password=todo
spring.datasource.hikari.connection-test-query=SELECT SYSDATE FROM DUAL

# MyBatis
mybatis.configuration.map-underscore-to-camel-case=true

# 포트 번호 설정
server.port=9090

# Gson HTTP Message Converter
spring.mvc.converters.preferred-json-mapper=gson
생성한 데이터베이스 정보에 맞게 application.properties를 작성한다.
또한 포트 번호를 따로 지정해줘서 다른 프로젝트와 서버가 겹치지 않도록 했다.
5) 프로젝트 구조 설정, 부트스트랩 적용하기
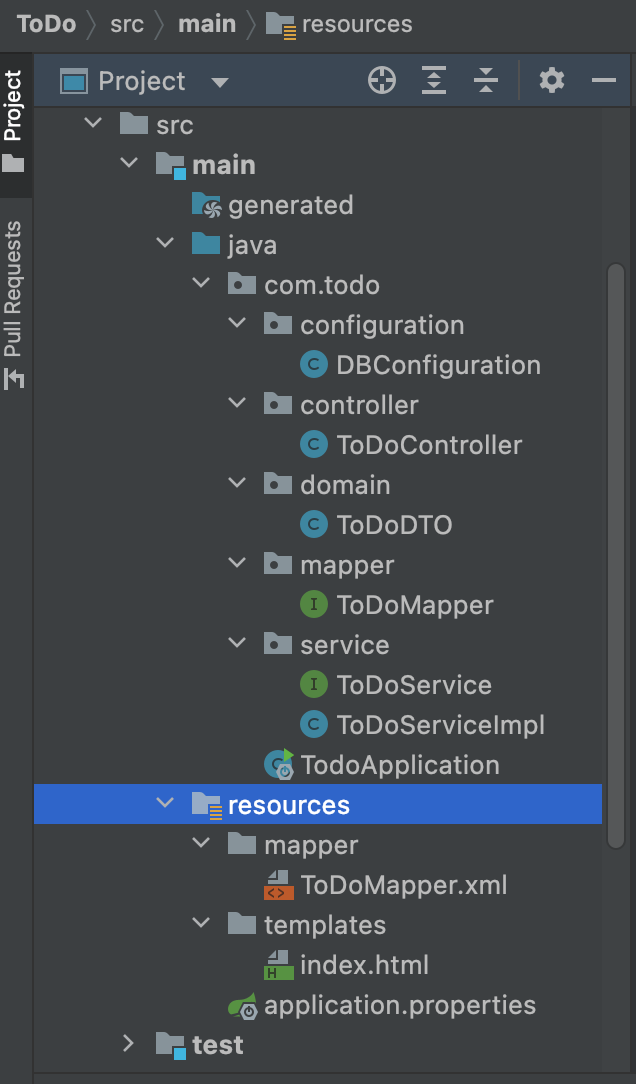
필요한 패키지를 생성 해준다.
- src
- main
- java
- com
- todo
- configuration
- controller
- domain
- mapper
- service
- todo
- com
- java
- main
- resources
- mapper
- templates
사용한 부트스트랩이 단일 페이지기도 했고 CDN을 사용해서 static 폴더를 따로 만들지 않았다.
부트스트랩은 templates 폴더 아래에 index라는 이름으로 넣어줬다.
항상 부트스트랩을 사용한다면 나에게 맞게끔 내용을 날리는 작업이 필요하다.
이번 프로젝트 (프로젝트라고 하기에도 좀 민망)는 단일 페이지에다가 코드 양 자체가 작아서 편하게 날릴 수 있었다.
나에게 맞춘 부트스트랩 코드는 아래와 같다.
<!DOCTYPE html>
<html lang="en">
  <head>
    <script src="https://ajax.googleapis.com/ajax/libs/angularjs/1.7.9/angular.min.js"></script>
    <link
      rel="stylesheet"
      href="https://stackpath.bootstrapcdn.com/bootstrap/4.4.1/css/bootstrap.min.css"
      integrity="sha384-Vkoo8x4CGsO3+Hhxv8T/Q5PaXtkKtu6ug5TOeNV6gBiFeWPGFN9MuhOf23Q9Ifjh"
      crossorigin="anonymous"
    />

    <style>
      .app-container {
        height: 100vh;
        width: 100%;
      }
      .complete {
        text-decoration: line-through;
      }
    </style>
  </head>
  <body>
    <div
      class="app-container d-flex align-items-center justify-content-center flex-column"
      ng-app="myApp"
      ng-controller="myController"
    >

      <h3>Todo App</h3>
      <div class="d-flex align-items-center mb-3">
        <div class="form-group mr-3 mb-0">
          <input

            type="text"
            class="form-control"
            id="formGroupExampleInput"
            placeholder="Enter a task here"
          />
        </div>
        <button
          type="button"
          class="btn btn-primary mr-3"
        >
          Save
        </button>

      </div>

      <div class="table-wrapper">
        <table class="table table-hover table-bordered">
          <thead>
            <tr>
              <th>No.</th>
              <th>Todo item</th>
              <th>status</th>
              <th>Actions</th>
            </tr>
          </thead>
          <tbody>
            <tr>
              <td></td> <!--no-->
              <td</td> <!--item-->
              <td></td> <!--status-->
              <td>
                <button class="btn btn-danger">
                  Delete
                </button>
                <button class="btn btn-success">
                  Finished
                </button>
              </td>
            </tr>
          </tbody>
        </table>
      </div>
    </div>

    <script
      src="https://code.jquery.com/jquery-3.4.1.slim.min.js"
      integrity="sha384-J6qa4849blE2+poT4WnyKhv5vZF5SrPo0iEjwBvKU7imGFAV0wwj1yYfoRSJoZ+n"
      crossorigin="anonymous"
    ></script>
    <script
      src="https://cdn.jsdelivr.net/npm/popper.js@1.16.0/dist/umd/popper.min.js"
      integrity="sha384-Q6E9RHvbIyZFJoft+2mJbHaEWldlvI9IOYy5n3zV9zzTtmI3UksdQRVvoxMfooAo"
      crossorigin="anonymous"
    ></script>
    <script
      src="https://stackpath.bootstrapcdn.com/bootstrap/4.4.1/js/bootstrap.min.js"
      integrity="sha384-wfSDF2E50Y2D1uUdj0O3uMBJnjuUD4Ih7YwaYd1iqfktj0Uod8GCExl3Og8ifwB6"
      crossorigin="anonymous"
    ></script>
  </body>
</html>
이렇게 나에게 맞춘 껍데기가 완성 되었고 여기에다가 살을 덧 붙이면 된다!
6) DBConfiguration.java 작성하기
Oracle (Oracle + MyBatis + HikariCP) 연동하기 위해 configuration 패키지에 DBConfiguration.java 파일을 생성하여
아래 코드와 같이 작성했다.
package com.todo.configuration;

import javax.sql.DataSource;

import org.apache.ibatis.session.SqlSessionFactory;
import org.mybatis.spring.SqlSessionFactoryBean;
import org.mybatis.spring.SqlSessionTemplate;
import org.springframework.beans.factory.annotation.Autowired;
import org.springframework.boot.context.properties.ConfigurationProperties;
import org.springframework.context.ApplicationContext;
import org.springframework.context.annotation.Bean;
import org.springframework.context.annotation.Configuration;
import org.springframework.context.annotation.PropertySource;

import com.zaxxer.hikari.HikariConfig;
import com.zaxxer.hikari.HikariDataSource;

@Configuration // 자바 기반의 설정 파일
@PropertySource("classpath:/application.properties") // 해당 클래스에서 참조할 properties 파일의 위치를 지정
public class DBConfiguration {

    @Autowired // 빈으로 등록된 인스턴스 (객체)를 클래스에 주입하는데 사용
    private ApplicationContext applicationContext;

    @Bean // configuration 클래스의 메소드 레벨에만 지정이 가능하며 어노테이션 빈이 지정된 객체는 컨테이너에 의해 관리되는 빈으로 등록됨
    @ConfigurationProperties(prefix = "spring.datasource.hikari")
    public HikariConfig hikariConfig() {
        return new HikariConfig();
    }

    @Bean
    public DataSource dataSource() {
        return new HikariDataSource(hikariConfig());
    }

    @Bean
    public SqlSessionFactory sqlSessionFactory() throws Exception {
        SqlSessionFactoryBean factoryBean = new SqlSessionFactoryBean();
        factoryBean.setDataSource(dataSource());
        factoryBean.setMapperLocations(applicationContext.getResources("classpath*:/mapper/**/*Mapper.xml"));
        factoryBean.setTypeAliasesPackage("com.todo.domain");
        factoryBean.setConfiguration(mybatisConfg());
        return factoryBean.getObject();
    }

    @Bean
    public SqlSessionTemplate sqlSession() throws Exception {
        return new SqlSessionTemplate(sqlSessionFactory());
    }

    @Bean
    @ConfigurationProperties(prefix="mybatis.configuration")
    public org.apache.ibatis.session.Configuration mybatisConfg(){
        return new org.apache.ibatis.session.Configuration();
    }

}
7) ToDoDTO 작성하기
package com.todo.domain;

import lombok.Getter;
import lombok.Setter;

@Getter
@Setter
public class ToDoDTO {
    private Long idx;
    private String item;
    private String status;
}
롬복(Getter, Setter)을 사용하여 간단히 작성 해줬다.
8) ToDoMapper.java 작성하기
mapper 패키지 아래에 ToDoMapper.java 파일을 생성하고 아래의 코드와 같이 작성한다.
package com.todo.mapper;

import java.util.List;

import org.apache.ibatis.annotations.Mapper;

import com.todo.domain.ToDoDTO;

@Mapper
public interface ToDoMapper {
    public List<ToDoDTO> selectToDoList();
    public int insertToDoList(ToDoDTO params);
    public int updateToDoList(ToDoDTO params);
    public int deleteToDoList(Long idx);
}
@Mapper 어노테이션을 사용하면 빈(Bean)으로 등록되어 Service단에서 Autowired하게 사용할 수 있다.
메소드 명은 ToDoMapper.xml에서 작성할 id와 일치 시켜줘야 한다.
9) ToDoService 작성하기
service 패키지 아래에 ToDoService.java를 생성하고 사용할 메소드에 대해 정의를 아래와 같이 작성한다.
package com.todo.service;

import com.todo.domain.ToDoDTO;

import java.util.List;

public interface ToDoService {
    public List<ToDoDTO> getToDoList();
    public boolean insertToDoList(ToDoDTO params);
    public boolean updateToDoList(ToDoDTO params);
    public boolean deleteToDoList(Long idx);
}
10) ToDoServiceImpl 작성하기
service 패키지 아래에 ToDoServiceImpl.java를 생성하고 사용할 메소드의 기능을 아래와 같이 작성한다.
package com.todo.service;

import org.springframework.beans.factory.annotation.Autowired;
import org.springframework.stereotype.Service;

import com.todo.domain.ToDoDTO;
import com.todo.mapper.ToDoMapper;

import java.util.List;

@Service
public class ToDoServiceImpl implements ToDoService{

    @Autowired
    private ToDoMapper toDoMapper;

    @Override
    public List<ToDoDTO> getToDoList() {
        List<ToDoDTO> todoList = toDoMapper.selectToDoList();
        return todoList;
    }

    @Override
    public boolean insertToDoList(ToDoDTO params){
        int queryResult = 0;
        if(params != null)
           queryResult = toDoMapper.insertToDoList(params);
        return (queryResult == 1) ? true : false;
    }

    @Override
    public boolean updateToDoList(ToDoDTO params){
        int queryResult = 0;
        if(params != null)
            queryResult = toDoMapper.updateToDoList(params);
        return (queryResult == 1) ? true : false;
    }

    @Override
    public boolean deleteToDoList(Long idx){
        int queryResult = 0;
        if(idx != null)
            queryResult = toDoMapper.deleteToDoList(idx);
        return (queryResult == 1) ? true : false;
    }
}
| 메소드 | 정의 및 기능 |
| getToDoList() | 저장된 할 일 목록을 List(제네릭 형태로) 가져옴 |
| insertToDoList() | 입력한 할 일을 저장 |
| updateToDoList() | 할 일을 수행 했는지, 안했는지 상태를 수정 (업데이트) |
| deleteToDoList() | 할 일을 삭제 idx를 넘겨줘서 선택한 할 일만 삭제하도록 함 |
📌 참고
여기서 Service와 ServiceImpl의 차이점에 대해 알아가면 좋을 것 같아 관련 글의 링크를 남긴다
[개발자 블로그] Spring에서 Service ServiceImpl 사용해야하는지
스프링 코드를 보면 Service인터페이스를 두고 ServiceImpl로 이를 구현하는 경우를 자주 볼 수 있다. 이 전에 정리했던 ‘스프링 의존성 주입과 인터페이스’에 이어 다시 한 번 더 정리를 하고 싶어
jeonyoungho.github.io
11) ToDoMapper.xml 작성하기
resources/mapper 아래에 실행할 쿼리문을 작성하기 위해 ToDoMapper.xml 파일을 생성하고 아래와 같이 작성해준다.
<?xml version="1.0" encoding="UTF-8"?>
<!DOCTYPE mapper PUBLIC "-//mybatis.org//DTD Mapper 3.0//EN" "http://mybatis.org/dtd/mybatis-3-mapper.dtd">
<mapper namespace="com.todo.mapper.ToDoMapper">

    <sql id="todoColumns">
        idx, item, status
    </sql>

    <select id="selectToDoList" resultType="ToDoDTO">
        SELECT <include refid="todoColumns" />
        FROM todo
        order by idx desc
    </select>

    <insert id="insertToDoList" parameterType="ToDoDTO">
        INSERT INTO todo (
            <include refid="todoColumns"/>
        ) VALUES (
            seq_idx_no.nextval
            , #{item}
            , 'N'
        )
    </insert>

    <update id="updateToDoList" parameterType="ToDoDTO">
        UPDATE todo
        SET
            status = 'Y'
        WHERE idx = #{idx}
    </update>

    <delete id="deleteToDoList" parameterType="long">
        DELETE todo
        where idx = #{idx}
    </delete>

</mapper>
현재는 테이블 컬럼도 매우 작고 간단해서 하나 하나 작성해줘도 상관 없지만
컬럼 수가 엄청 많고 반복해서 컬럼 이름을 써야할 경우에는 위와 같이 <sql> 태그를 사용하여 id의 이름을 가지고 접근하는 것도 매우 편하다.
| id | 설명 |
| selectToDoList | 할 일 (목록) 조회 최근에 입력한 할 일을 상단에 보여주기 위해 idx를 기준으로 내림차순 정렬을 주었다. |
| insertToDoList | 할 일 저장 계산하기 편하게 생성한 시퀀스의 다음 값을 idx에 주었으며 (방금) 입력한 할 일은 완료 하지 않은 할 일이라 판단하여 default 값을 N으로 설정 하였다. |
| updateToDoList | 할 일 수정(상태 업데이트) 할 일을 저장 할 때 default 값으로 N을 저장하고 해당 할 일을 완료 했을 때 상태를 Y로 업데이트 해준다. |
| deleteToDoList | 할 일 삭제 선택한 특정 할 일을 삭제해주기 위해서 할 일 목록의 고유번호인 idx를 조건문으로 주었다. |
12) ToDoController 작성하기
package com.todo.controller;

import com.todo.domain.ToDoDTO;
import com.todo.service.ToDoService;
import org.springframework.beans.factory.annotation.Autowired;
import org.springframework.stereotype.Controller;
import org.springframework.ui.Model;
import org.springframework.validation.BindingResult;
import org.springframework.web.bind.annotation.*;

import java.util.List;

@Controller
public class ToDoController {

    @Autowired
    private ToDoService toDoService;

    @GetMapping(value = "/")
    public String todoList(Model model){
        List<ToDoDTO> toDoList = toDoService.getToDoList();
        model.addAttribute("toDoList", toDoList);
        model.addAttribute("todo", new ToDoDTO());
        return "index";
    }

    @PostMapping(value = "/todo/register.do")
    public String insertToDoList(Model model, ToDoDTO params){
        toDoService.insertToDoList(params);
        return "redirect:/";
    }

    @PostMapping(value = "/todo/update.do")
    public String updateToDoList(@RequestParam(value = "idx", required = false) Long idx, ToDoDTO params){
        System.out.print("check");
        System.out.println(idx);
        toDoService.updateToDoList(params);
        return "redirect:/";
    }

    @PostMapping(value="/todo/delete.do")
    public String deleteToDoList(@RequestParam(value="idx", required = false) Long idx){
        System.out.println("삭제"+idx);
        toDoService.deleteToDoList(idx);
        return "redirect:/";
    }
}| 어노테이션 | 설명 |
| @GetMapping(value="/") | 투두 리스트의 메인 페이지로 맵핑 제네릭 형태인 List로 받아오도록 함 toDoList: 투두 리스트를 보내주기 위함 todo: 투두에서 객체를 받기 위함 |
| @PostMapping(value="/todo/register.do") | 할 일(객체)을 등록으로 맵핑 단일 페이지의 프로젝트이므로 return은 redirect:/으로 줌 |
| @PostMapping(value="/todo/update.do") | 수정된 할 일 (객체)을 업데이트로 맵핑 단일 페이지의 프로젝트이므로 return은 redirect:/으로 줌 |
| @PostMapping(value="/todo/delete.do") | 할 일의 고유 번호에 따라 삭제하도록 하는 맵핑 단일 페이지의 프로젝트이므로 return은 redirect:/으로 줌 |
13) index.html(부트스트랩) 마무리 작성하기
<!DOCTYPE html>
<html xmlns="http://www.w3.org/1999/xhtml"
      xmlns:th="http://thymeleaf.org">
<head>
    <script src="https://ajax.googleapis.com/ajax/libs/angularjs/1.7.9/angular.min.js"></script>
    <link
            rel="stylesheet"
            href="https://stackpath.bootstrapcdn.com/bootstrap/4.4.1/css/bootstrap.min.css"
            integrity="sha384-Vkoo8x4CGsO3+Hhxv8T/Q5PaXtkKtu6ug5TOeNV6gBiFeWPGFN9MuhOf23Q9Ifjh"
            crossorigin="anonymous"
    />

    <style>
        .app-container {
            height: 100vh;
            width: 100%;
        }
        .complete {
            text-decoration: line-through;
        }
    </style>
</head>
<body>
<div
        class="app-container d-flex align-items-center justify-content-center flex-column"
        ng-app="myApp"
        ng-controller="myController"
>
    <h3>Todo App</h3>
    <div class="d-flex align-items-center mb-3" style="display: inline-block;">
        <form class="form-group mr-3 mb-0" th:action="@{/todo/register.do}" th:object="${todo}" method="post">
            <div style="display: inline-block">
                <input th:field="*{item}" type="text" class="form-control" style="vertical-align:middle" placeholder="할 일을 적어주세요"/>
            </div>
            <div style="display: inline-block">
                <button type="submit" class="btn btn-primary mr-3">Save</button>
            </div>
        </form>
    </div>

    <div class="table-wrapper" th:object="${todo}" method="post">
        <table class="table table-hover table-bordered">
            <thead>
            <tr>
                <th>No.</th>
                <th>Todo item</th>
                <th>status</th>
                <th>Actions</th>
            </tr>
            </thead>
            <tbody>
            <tr th:if="${not #lists.isEmpty(toDoList)}" th:each="todo,index : ${toDoList}">
                <td th:text="${index.index}" th:style="${todo.status == 'Y' ? 'text-decoration: line-through;': 'text-decoration: none;'}"></td> <!-- no-->
                <td th:text="${todo.item}" th:style="${todo.status == 'Y' ? 'text-decoration: line-through;': 'text-decoration: none;'}"></td> <!--item-->
                <td th:text="${todo.status}"></td> <!-- status-->
                <td>
                    <button type="button" class="btn btn-danger" th:onclick="deleteToDoList([[  ${todo.idx}]], [[${index.index} ]])">Delete</button>
                    <button type="button" class="btn btn-success" th:onclick="updateToDoList([[ ${todo.idx}]], [[${index.index} ]])">Finished</button>
                </td> <!-- action-->
            </tr>
            </tbody>
        </table>
    </div>
</div>

<th:block layout:fragment="script">
    <script th:inline="javascript">
        /*<![CDATA[*/

        function updateToDoList(idx, index) {
            if (confirm(index + "번 할 일을 하셨나요?")) {
                var uri = /*[[ @{/todo/update.do} ]]*/null;
                var html = "";

                html += '<form name="dataForm" action="'+uri+'" method="post">';
                html += '<input type="hidden" name="idx" value="'+idx+'" />';
                html += '</form>';

                $("body").append(html);
                document.dataForm.submit();
            }
        }

        function deleteToDoList(idx, index) {
            if (confirm(index + "번 할 일을 삭제할까요?")) {
                var uri = /*[[ @{/todo/delete.do} ]]*/null;
                var html = "";

                html += '<form name="dataForm" action="'+uri+'" method="post">';
                html += '<input type="hidden" name="idx" value="'+idx+'" />';
                html += '</form>';

                $("body").append(html);
                document.dataForm.submit();
            }
        }

        /*]]>*/
    </script>
<script
        src="https://code.jquery.com/jquery-3.4.1.slim.min.js"
        integrity="sha384-J6qa4849blE2+poT4WnyKhv5vZF5SrPo0iEjwBvKU7imGFAV0wwj1yYfoRSJoZ+n"
        crossorigin="anonymous"
></script>
<script
        src="https://cdn.jsdelivr.net/npm/popper.js@1.16.0/dist/umd/popper.min.js"
        integrity="sha384-Q6E9RHvbIyZFJoft+2mJbHaEWldlvI9IOYy5n3zV9zzTtmI3UksdQRVvoxMfooAo"
        crossorigin="anonymous"
></script>
<script
        src="https://stackpath.bootstrapcdn.com/bootstrap/4.4.1/js/bootstrap.min.js"
        integrity="sha384-wfSDF2E50Y2D1uUdj0O3uMBJnjuUD4Ih7YwaYd1iqfktj0Uod8GCExl3Og8ifwB6"
        crossorigin="anonymous"
></script>
</body>
</html>
index를 추가해서 할 일을 삭제하면 삭제한 이후의 할 일 목록의 상태에 따라 번호를 정의하도록 함
구현 결과
자세한 코드는 깃허브에 적혀있습니다!
https://github.com/rgl-za/ToDo
GitHub - rgl-za/ToDo: 2 :Do 📌 투두리스트 웹 사이트
2 :Do 📌 투두리스트 웹 사이트. Contribute to rgl-za/ToDo development by creating an account on GitHub.
github.com
'스터디 > 프로젝트' 카테고리의 다른 글
| [JSP/Servlet] 게시판 프로젝트 (2) 구조 및 조건 (0) | 2022.04.14 |
|---|---|
| [JSP/Servlet] 게시판 프로젝트 (1) 전반적인 흐름 파악하기 (0) | 2022.04.14 |