위 글은 유튜브 정대리님의 SwiftUI fundamental Tutorial 강좌를 보고 작성한 정리글로
자세한 내용은 유튜브를 통해 확인하시길 권장합니다.
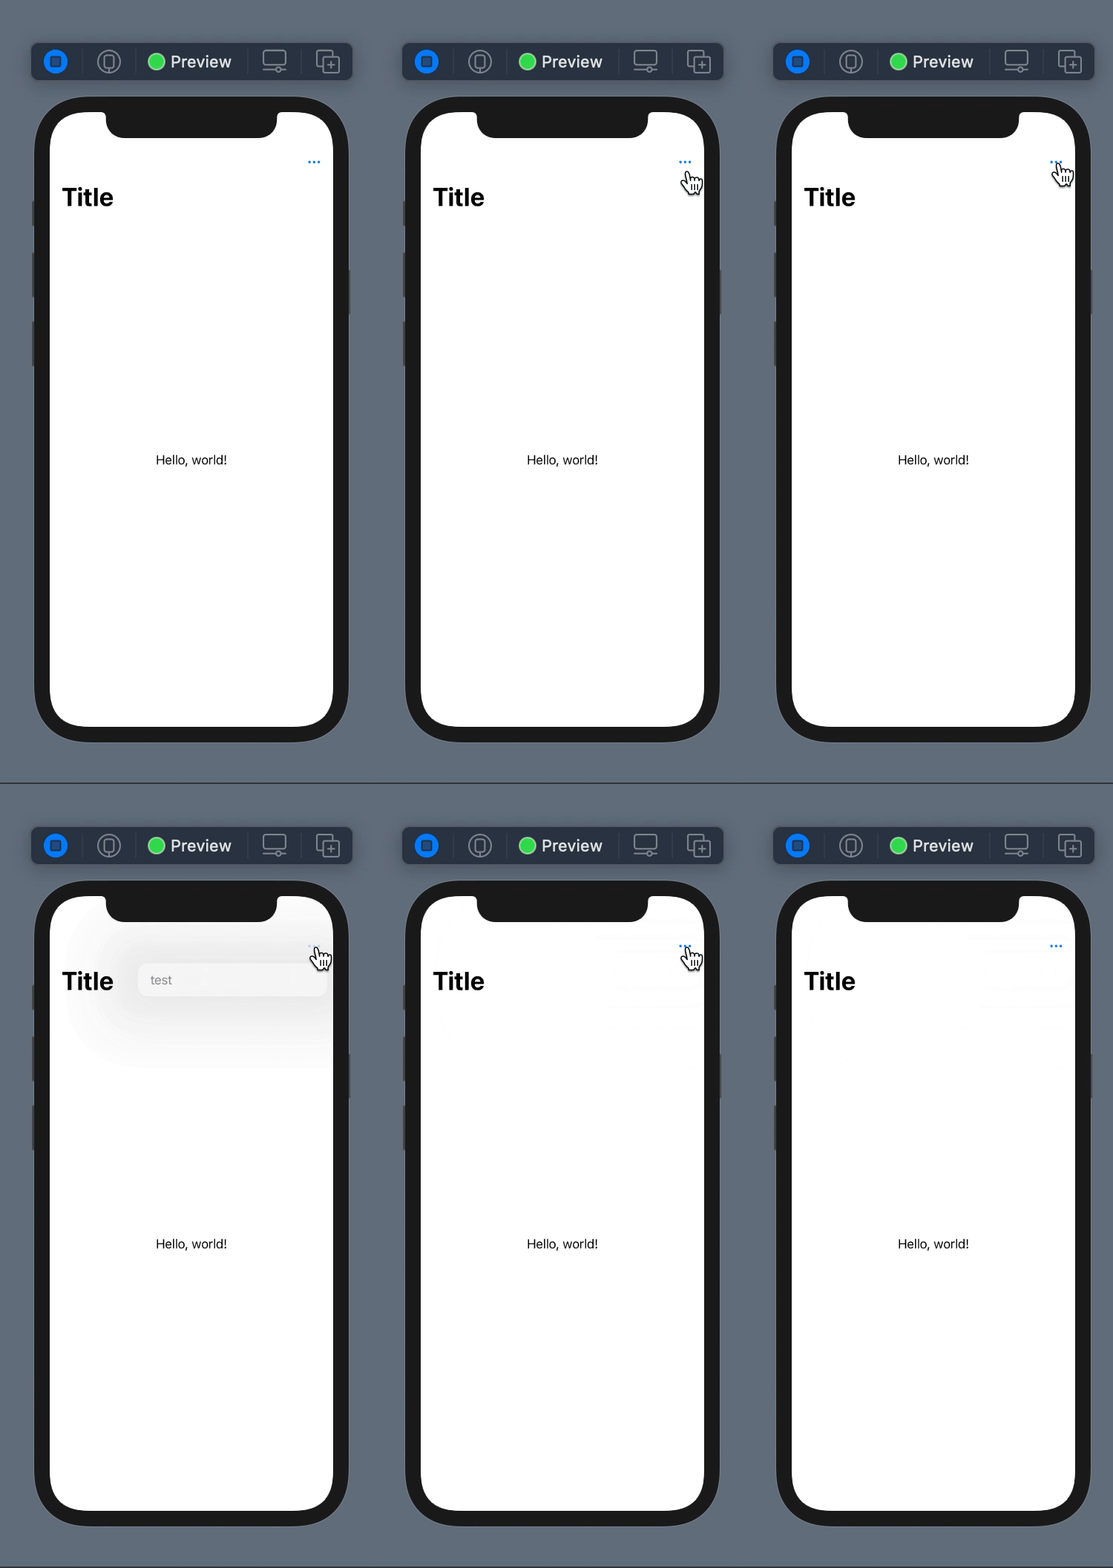
메뉴를 만드는 방법은 크게 2가지로 구분할 수 있는데
1. View에다가 Context Menu를 붙이는 방법
2. UIKit의 (Tab) Bar Menu 아이템을 넣는 방법
import SwiftUI

struct ContentView: View {
    var body: some View {

        NavigationView{
            Text("Hello, world!")
                .padding()
                .navigationTitle("Title")

                .toolbar(content: {
                    ToolbarItem(placement: .primaryAction,
                        content: {

                        Menu(content: {
                            Text("test")
                        }, label: {
                            Label("more", systemImage: "ellipsis")
                        })
                    })
                })
        }
    }
}
toolbar: 쉽게 생각해서 navigation toolbar라고 생각하면 될듯
ToolbarItem(palcement: 위치, content: 내용)
Menu(content: 메뉴의 갯수, label: 메뉴 버튼 자체)
메뉴는 VStack이랑 같다고 보면 됨

📌 참고 멀티 트레일링 클로저 적용 전 후 (버튼, 라벨 등등 적용 가능): 이에 따른 내용의 변화는 없음
Button(action: {

}, label: {
	Label("CHEER UP", systemImage: "hand.thumbsup.fill")
})
Button{
}, label: {
Label("CHEER UP", systemImage: "hand.thumbsup.fill")
}
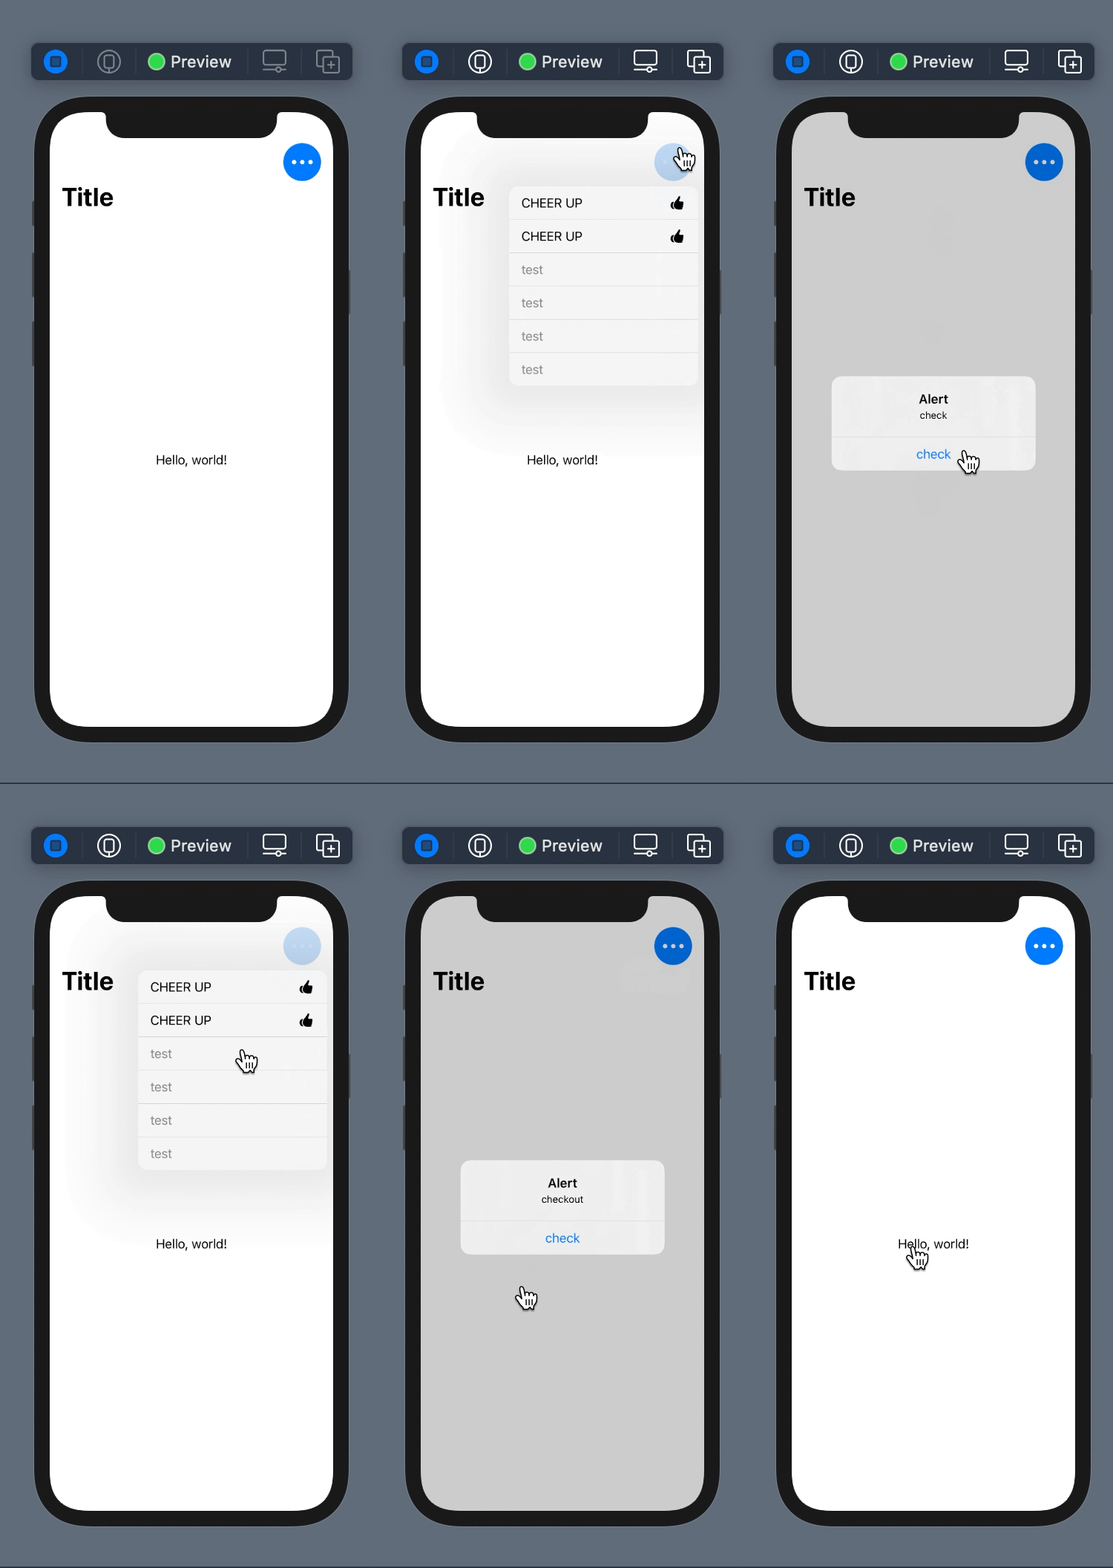
메뉴 (라벨)꾸미기 + 알림 설정
import SwiftUI

struct ContentView: View {

    @State private var shouldShowAlert : Bool = false
    @State private var myText : String = ""

    var body: some View {

        NavigationView{
            Text("Hello, world!")
                .padding()
                .navigationTitle("Title")

                .toolbar(content: {
                    ToolbarItem(placement: .navigationBarTrailing,
                        content: {

                        Menu(content: {

                            Button(action: {
                                //action 처리
                                print("check")
                                shouldShowAlert = true
                                myText = "check"
                            }, label: {
                                // label 처리
                                Label("CHEER UP", systemImage: "hand.thumbsup.fill")
                            })

                            // 버튼 멀티 트레일링 클로저
                            Button{
                                shouldShowAlert = true
                                myText = "checkout"

                            } label : {
                                Label("CHEER UP", systemImage: "hand.thumbsup.fill")

                            }

                            Text("test")
                            Text("test")
                            Text("test")
                            Text("test")

                        }, label: {
                            Circle().foregroundColor(.blue)
                                .frame(width: 50, height: 50)

                                .overlay(Label("more", systemImage: "ellipsis")
                                            .font(.system(size: 30))
                                            .foregroundColor(.white)
                                )

                        }) // Menu
                    }) // Label
                }) //toolbar

                .alert(isPresented: $shouldShowAlert, content: {
                    Alert(title: Text("Alert"), message: Text("\(myText)"), dismissButton: .default(Text("check"))
                    )
                })
        }
    }
}
메뉴의 라벨에다가 꾸며주면 됨
강의에선 메뉴 아이콘을 overlay를 이용하여 모형 위에 올려서 구현
State Bool 타입 변수로 버튼의 액션에 액션이 감지되면 True로 전환
State String 타입 변수로 버튼의 액션이 감지되면 Text를 주게끔 함
버튼 액션의 감지로 변화된 상태는 toolbar의 바깥에 .alert로 알람 메시지를 뿌리게끔 구현함

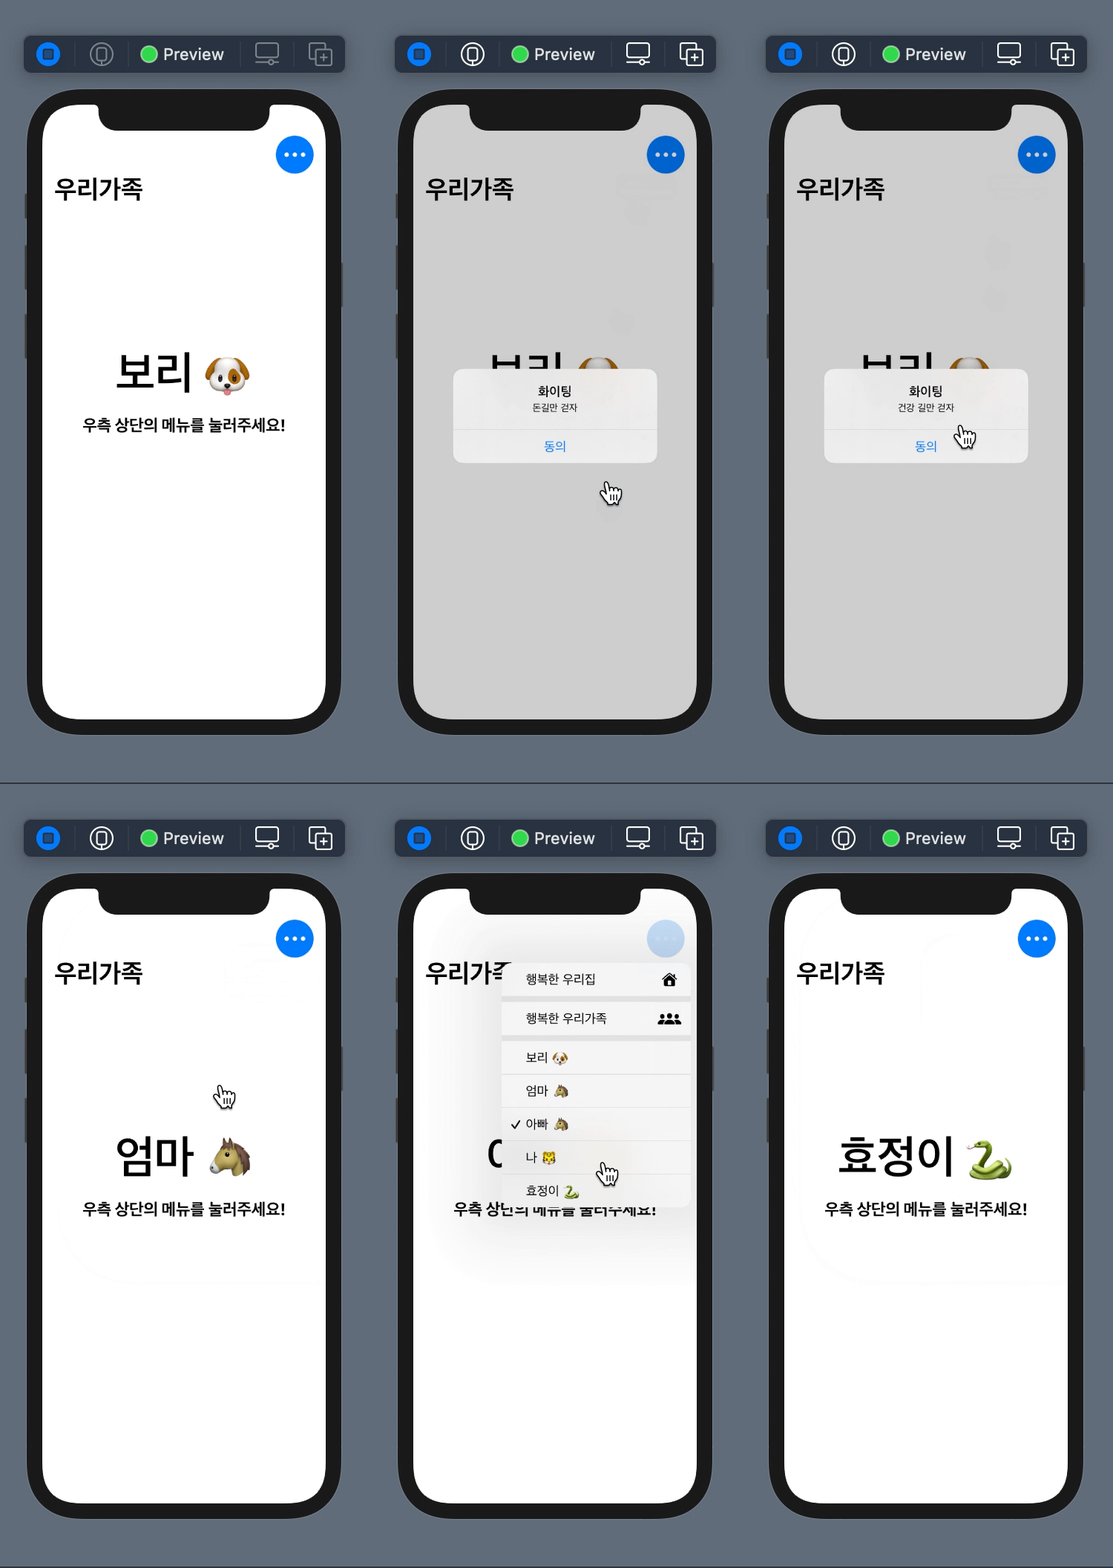
메뉴 섹션 나누기, 메뉴에 Picker 설정하기
import SwiftUI

let Family = ["보리 🐶", "엄마 🐴", "아빠 🐴","나 🐯","효정이 🐍"]

struct ContentView: View {

    @State private var shouldShowAlert : Bool = false
    @State private var myText : String = ""
    @State private var selected : Int = 0

    var body: some View {

        NavigationView{
            VStack(spacing: 20){
                Spacer() //가중치
                Text("\(Family[selected])")
                    .font(.system(size: 60))
                    .bold()

                Text("우측 상단의 메뉴를 눌러주세요!")
                    .font(.title2)
                    .fontWeight(.bold)
                Spacer()
                Spacer()
            }

                .padding()
                .navigationTitle("우리가족")

                .toolbar(content: {
                    ToolbarItem(placement: .navigationBarTrailing,
                        content: {

                        Menu(content: {

                            Button(action: {

                                print("check")
                                shouldShowAlert = true
                                myText = "돈길만 걷자"
                            }, label: {

                                Label("행복한 우리집", systemImage: "house.fill")
                            })

                            Section{ // 메뉴 섹션 나누기


                                Button{
                                    shouldShowAlert = true
                                    myText = "건강 길만 걷자"

                                } label : {
                                    Label("행복한 우리가족", systemImage: "person.3.fill")

                                }
                            }

                            Picker(selection: $selected, label: Text("우리 가족")){

                                ForEach(Family.indices, id: \.self, content: { index in
                                    Text("\(Family[index])").tag(index)

                                })
                            }


                        }, label: {
                            Circle().foregroundColor(.blue)
                                .frame(width: 50, height: 50)

                                .overlay(Label("more", systemImage: "ellipsis")
                                            .font(.system(size: 30))
                                            //색상 지정하는 다른 방법 Color.init(Color.Literal)
                                            .foregroundColor(.white)
                                )

                        }) // Menu
                    }) // Label
                }) //toolbar
                .alert(isPresented: $shouldShowAlert, content: {
                    Alert(title: Text("화이팅"), message: Text("\(myText)"), dismissButton: .default(Text("동의"))
                    )
                })
        }
    }
}
메뉴의 섹션 나누기: Section으로 Button을 감싸주면 됨
Picker 설정하기
State Int 타입 변수 선언: 배열의 무슨 인덱스를 클릭했는지 확인하기 위함
Picker(selection: $selected, label: Text("우리 가족")){
// foreach를 쓰면서 인덱스를 사용하기 위해서 indices 사용
ForEach(Family.indices, id: \.self, content: { index in
Text("\(Family[index])").tag(index)
})
}

'강의 > etc' 카테고리의 다른 글
| [SwiftUI fundamental Tutorial] Redux (0) | 2021.10.16 |
|---|---|
| [SwiftUI fundamental Tutorial] LazyVGrid (0) | 2021.10.07 |
| [SwiftUI fundamental Tutorial] Deeplink (0) | 2021.10.06 |
| [SwiftUI fundamental Tutorial] Picker, SegmentedStyle (0) | 2021.10.05 |
| [SwiftUI fundamental Tutorial] Toast, Popup (0) | 2021.09.16 |